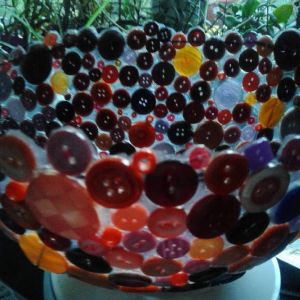
Putting a bookcase together!

Describe the most ambitious DIY project you’ve ever taken on.

I remember fighting to put a bookcase together. We had picture instructions. Various dowels and screws and covers to go over the screw heads, shelves, and a few bits that made a sort of plinth base thing. It was white coated MDF which had white hardboard that slotted together at the back. It came with pva glue that helped hold it together.

Once we got it out of the box we got confused with how to put it together. Place part A next to part C, use dowel B to join together etc etc…  But it gets boring after a bit. You spill the glue on the destructions (as I call them), which stick together and then, disaster(ish). It sort of looks like the picture on the box, but a bit like the leaning tower of Pisa! No matter, we will try putting books on when the glue dries…

Him indoors

Who do you spend the most time with?

We have been together so long.

The hours turn into days

Then months and years

Two people glued together

Joined at the hip

You won’t see him

He is hubby, partner

He is anonymous here

But we are together.

One the shadow of the other

I know when he’s coming home

I can understand him

We will always be together…

Pages from my book.

These are another couple of pages from my book, the story is on the right embedded in my photoshop drawing. The pattern on the left is a photo of arrow shaped post-it notes and multi coloured foil circles glued together to represent dragon scales. I used a website called Blurb to create a single copy of the book. It even has an ISBN number!

Dragon stone

I painted a stone with a dragon design, then I edited it in photodirector. The paint is in little bottles with a nozzle and you use it to add dots and lines onto a surface. I’m a bit unsteady with my hand and arm so it’s more wobbly than I would like. Once it’s dry I might take another photo. As the colours dry they seem to shrink because they seem to have glue in the paints. Especially the ones with added glitter.

Broken cat flap!

Crash! Smash! Clatter!

The big outside cat who now comes in has finally broken the cat flap! It was cracked in two yesterday, but with both parts still in place, but today? When we came home from my studio the cat flap was broken with two side pieces twisted away from each other and a pizza wedge shaped piece on the ground outside. The outdoor cat was inside and my female inside cat was staring through the cat flap from the outside! I opened the door and let her in. But how to try and fix this? Glue and wide clear tape. I tried gluing the edges, but I was just making a sticky mess. Next I dabbed glue on the flat surfaces and stuck the clear tape to them like a bandage. Next I slid the wedge shape up between the sides and wrapped another lot of tape and glue around the bottom of the flap. Finally I supported the flap on our toilet roll holder so it’s inside the door and horizontal. Why? Because it’s raining heavily and it would soon be soaking wet if I shut it. The door is also open to keep it out of the rain. I’m relying on the door between the kitchen and the backdoor staying shut to keep the cats in (and out).

Fingers crossed x

Printing…. Simply

I have been enjoying some print workshops at college.

We were shown how to create a printing surface by gluing tin foil to a board.

Then you paint it with black acrylic paint or ink.

Use impliments / household objects to make marks on the surface (sponge, pegs, coins, nails, comb etc). Each time you make marks place a sheet of paper on top and rub over with a bunched up pair of socks (stops you ripping the damp paper)

When your prints have dried you can cut them up and collage them. We did self portraits.

Cheap, fun and messy!

Layers of a collage.

From two years ago. Turning a drawing into a collage using Christmas wrapping paper, tissue paper and a shiny, metallic party bag.

I layered up the paper using dark urple tissue paper over a pale background to try and give the idea of silhouetted trees. Having stuck the purple colour down I then cut out the metallic paper to simulate the wire mesh fence. When I cut out the tree shape I wanted to give a feeling of the texture of tree bark. Finally I added paper on either side to act as curtains.

This was at an interesting collage workshop with the Orme art group about two years ago. I enjoyed learning a new skill.